How to upload to S3 in Next.js and save references in Postgres
Let users upload files directly to S3 by creating presigned URLs in Next.js and saving the references in a Postgres database.
In this guide, you will learn how to add a feature to a Next.js app that allows users to upload files to Amazon S3, and insert the references to them in Postgres (powered by Neon) via pg and @neondatabase/serverless.
Steps
- Create a Neon project
- Store your Neon credentials
- Create an Amazon S3 Bucket
- Create access keys for IAM users (in AWS)
- Create a new Next.js application
- Create a Presigned URL with Amazon S3 SDK
- Save Reference to S3 objects in Postgres
- Upload to Presigned URL with in-browser JavaScript
- Run the app
Create a Neon project
If you do not have one already, create a Neon project.
- Navigate to the Projects page in the Neon Console.
- Click New Project.
- Specify your project settings and click Create Project.
- Copy the database connection string to add to your Next.js app later. The connection string looks like
postgres://[user]:[password]@[neon_hostname]/[dbname]and can be found in the Connection Details widget on the Neon Dashboard.
Create an Amazon S3 Bucket
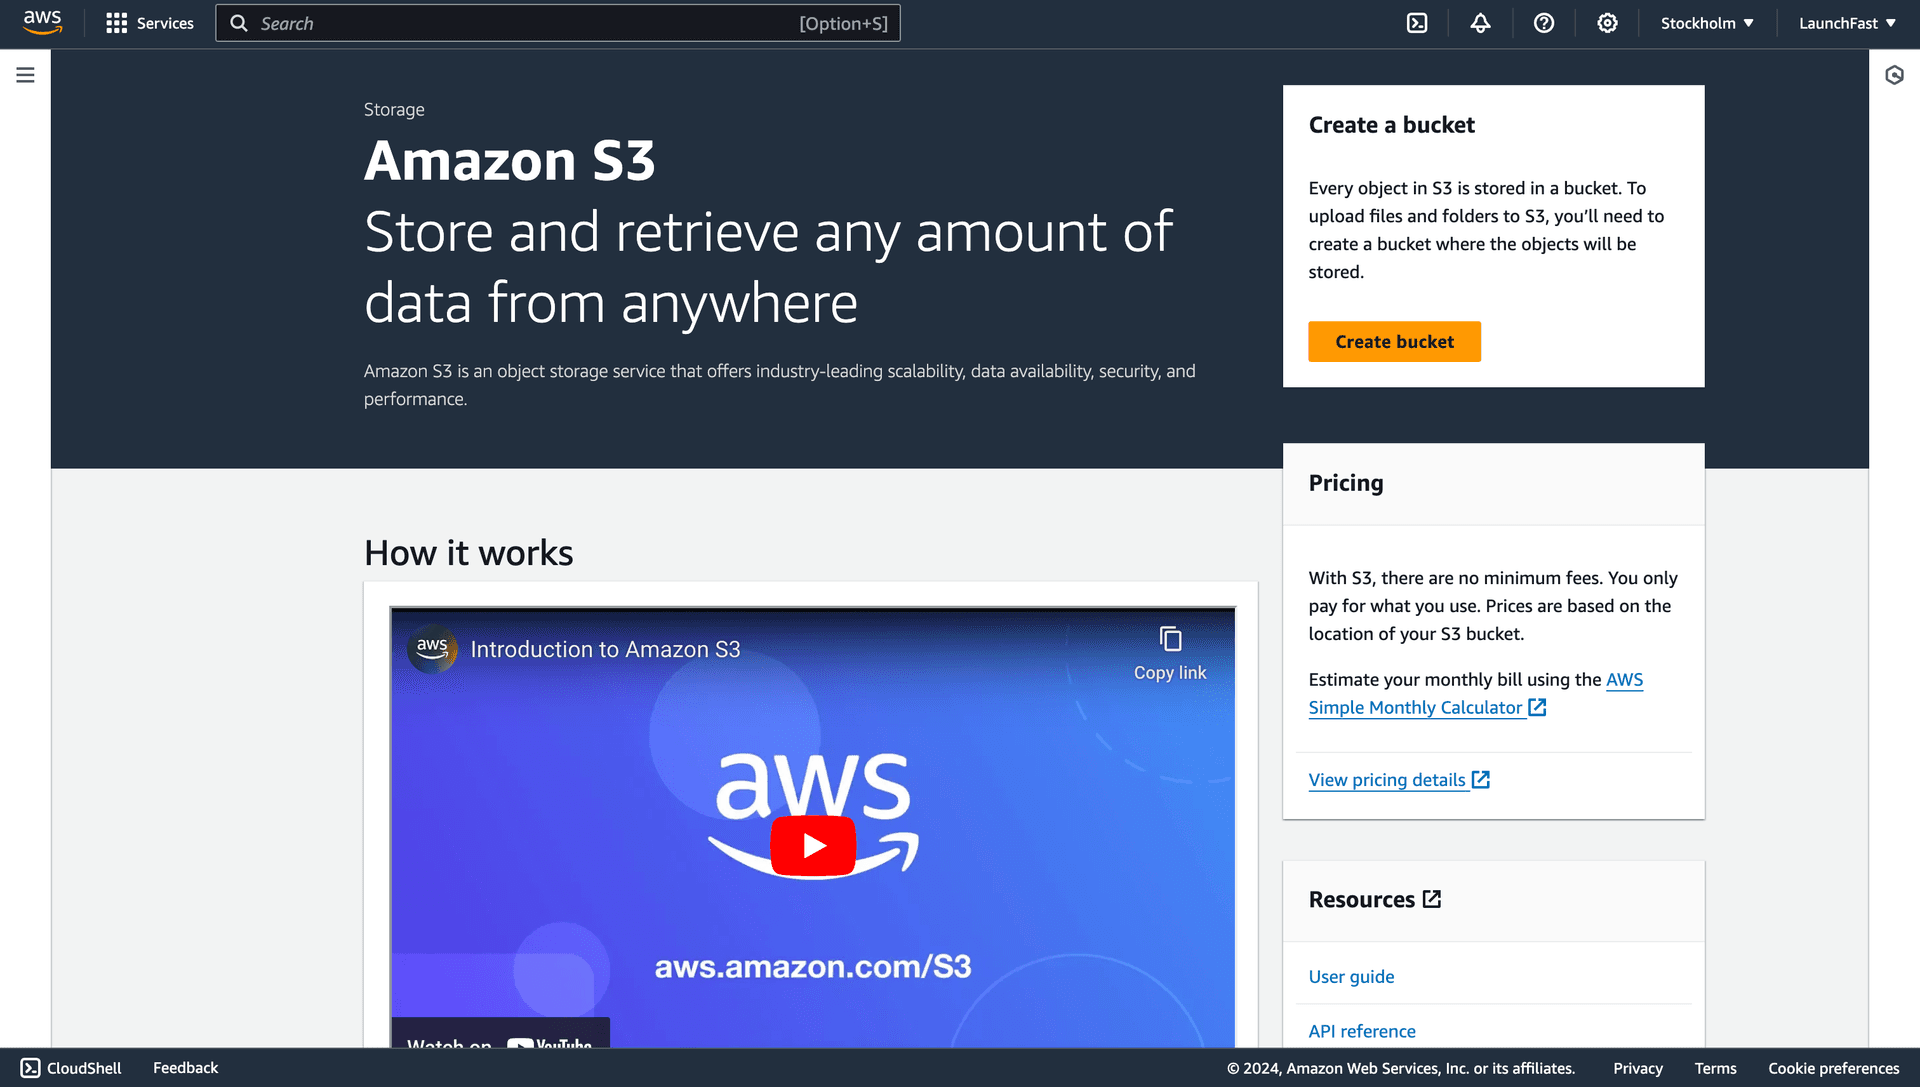
Open the Amazon S3 Bucket, and click Create bucket.
Enter a repository name, say my-custom-bucket-0 for example. Copy the bucket name to be used as AWS_S3_BUCKET_NAME in your application.
AWS_S3_BUCKET_NAME="my-custom-bucket-0"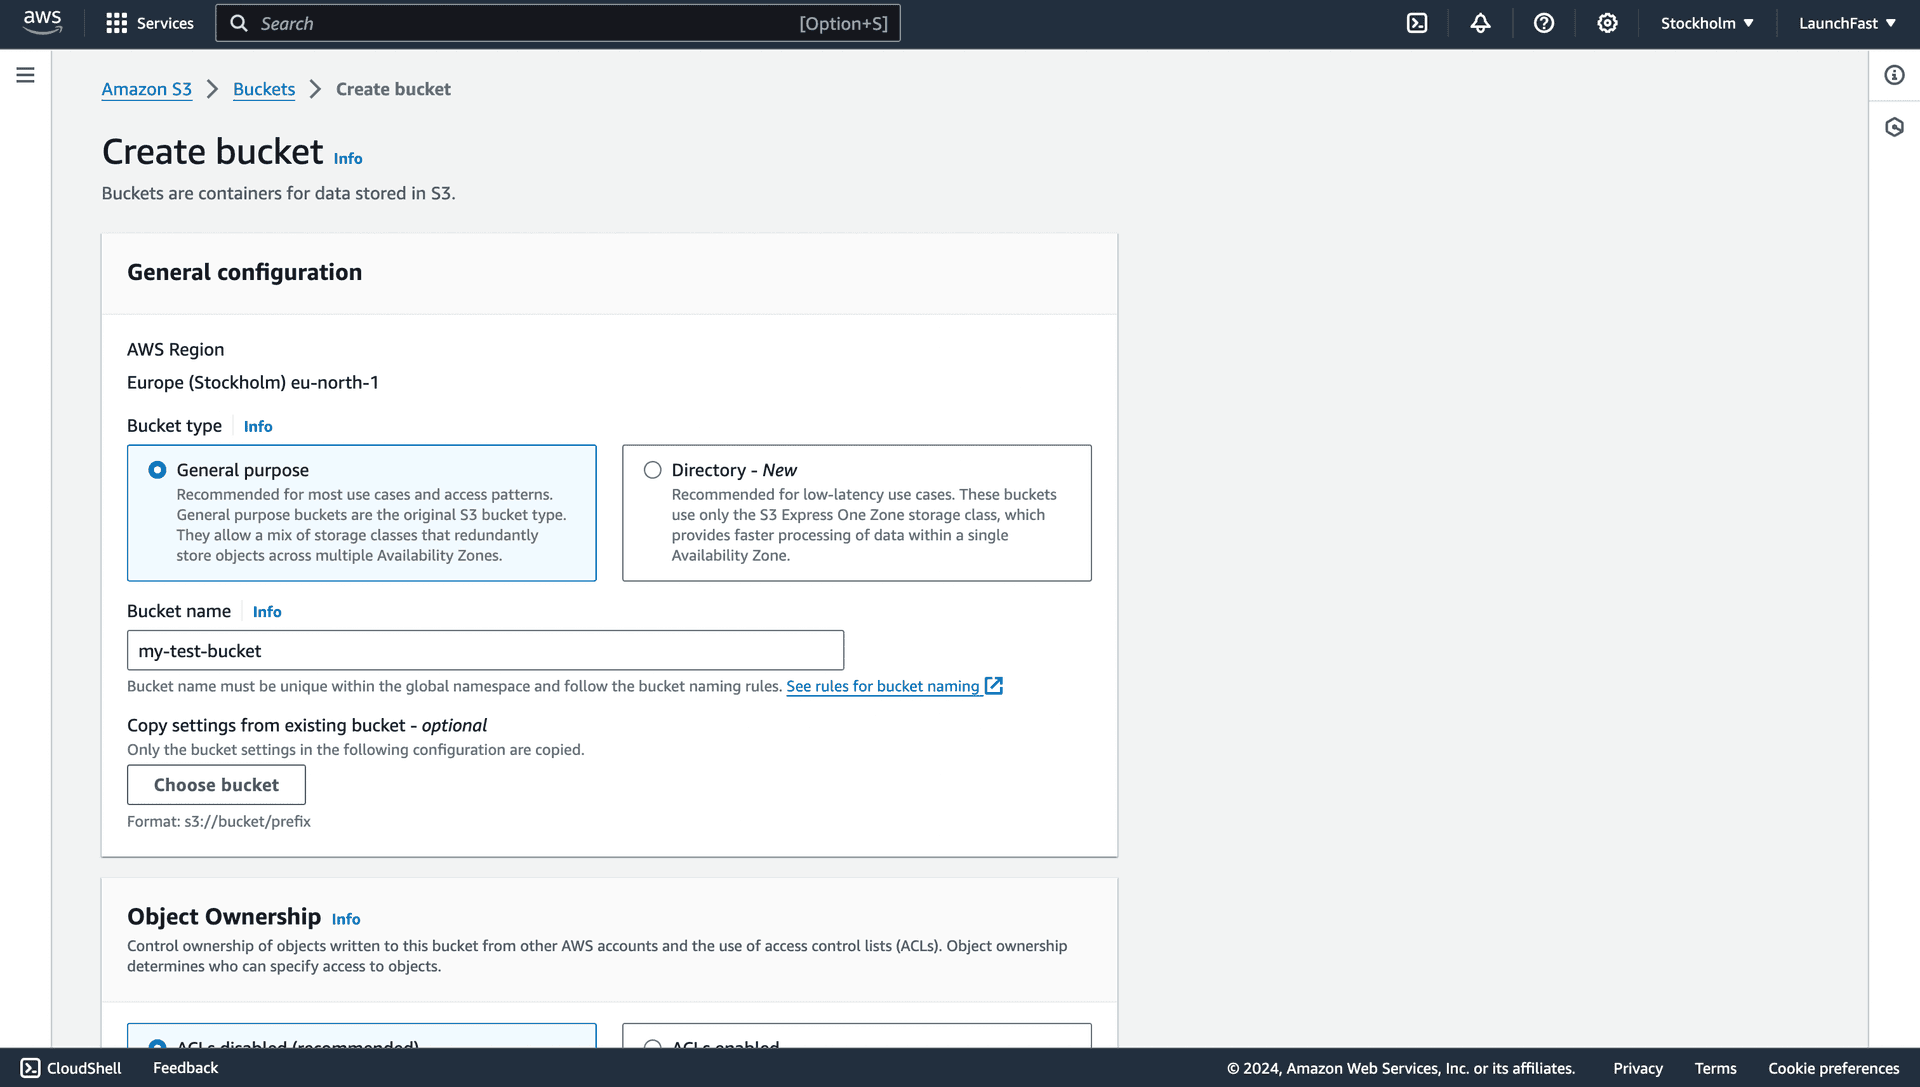
In the Policy section, use the following json to define the actions allowed with the bucket:
{
    "Version": "2012-10-17",
    "Statement": [
        {
            "Sid": "PublicReadGetObject",
            "Effect": "Allow",
            "Principal": "*",
            "Action": [
                "s3:PutObject",
                "s3:GetObject"
            ],
            "Resource": "arn:aws:s3:::launchfast-bucket-0/*"
        }
    ]
}
In the CORS section, use the following json to define the actions allowed with the bucket:
[
    {
        "AllowedHeaders": [
            "*"
        ],
        "AllowedMethods": [
            "GET",
            "PUT"
        ],
        "AllowedOrigins": [
            "*"
        ],
        "ExposeHeaders": [],
        "MaxAgeSeconds": 9000
    }
]
Finally, complete the bucket creation process by clicking the Create bucket at the end.
Create access keys for IAM users (in AWS)
In the navigation bar on the upper right in your AWS account, click on your name, and then choose Security credentials.
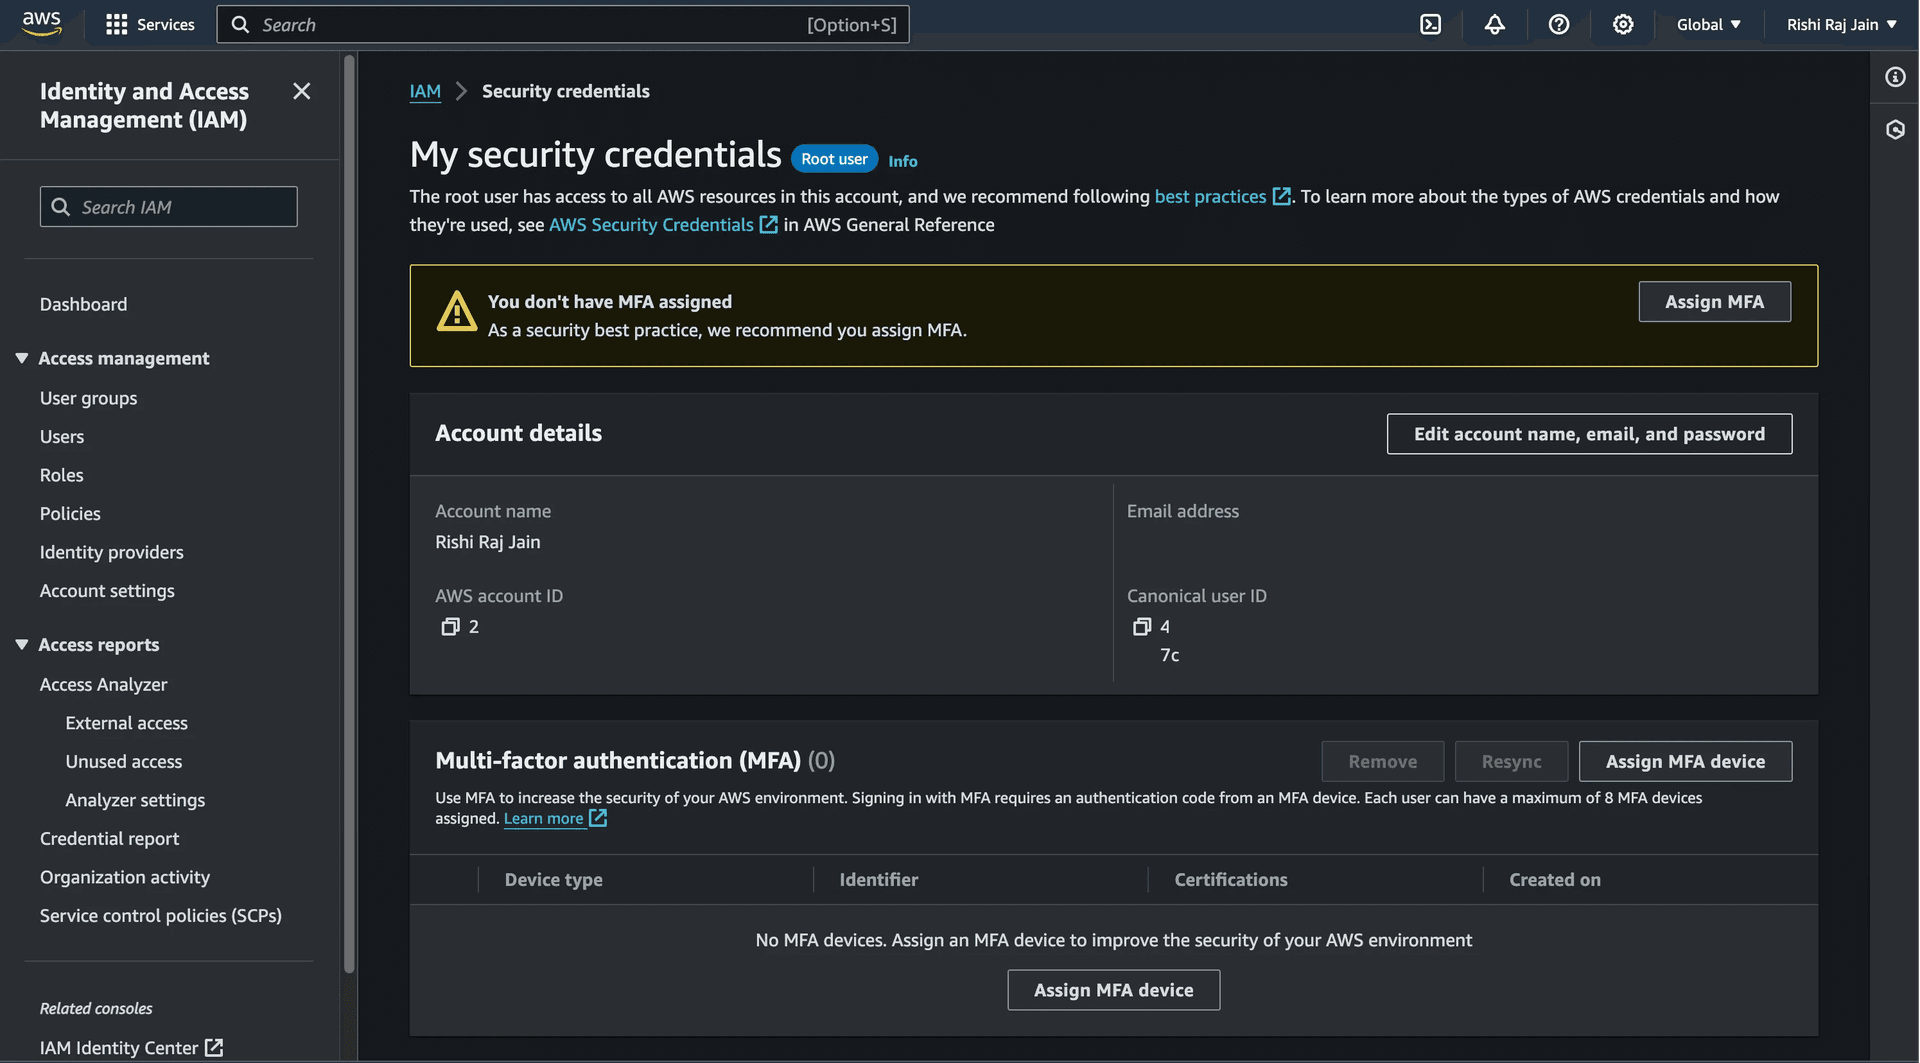
Scroll down to Access keys and click on Create access key.

Again, click on Create access key.
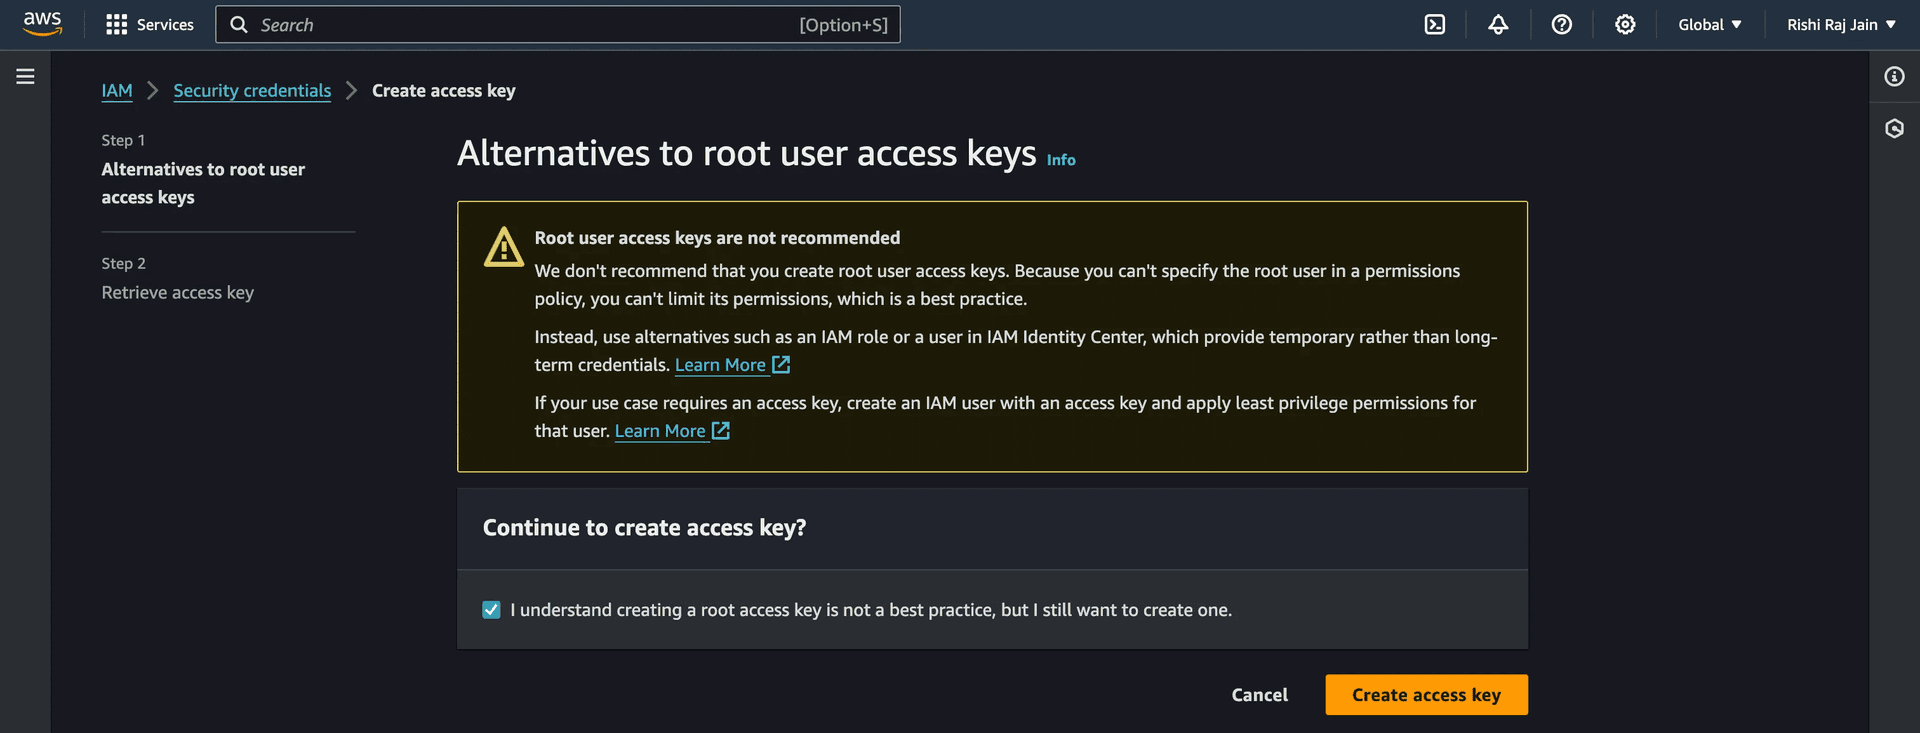
Copy the Access key and Secret access key, you will add them to your Next.js project later.
AWS_KEY_ID="..."
AWS_SECRET_ACCESS_KEY=".../...+"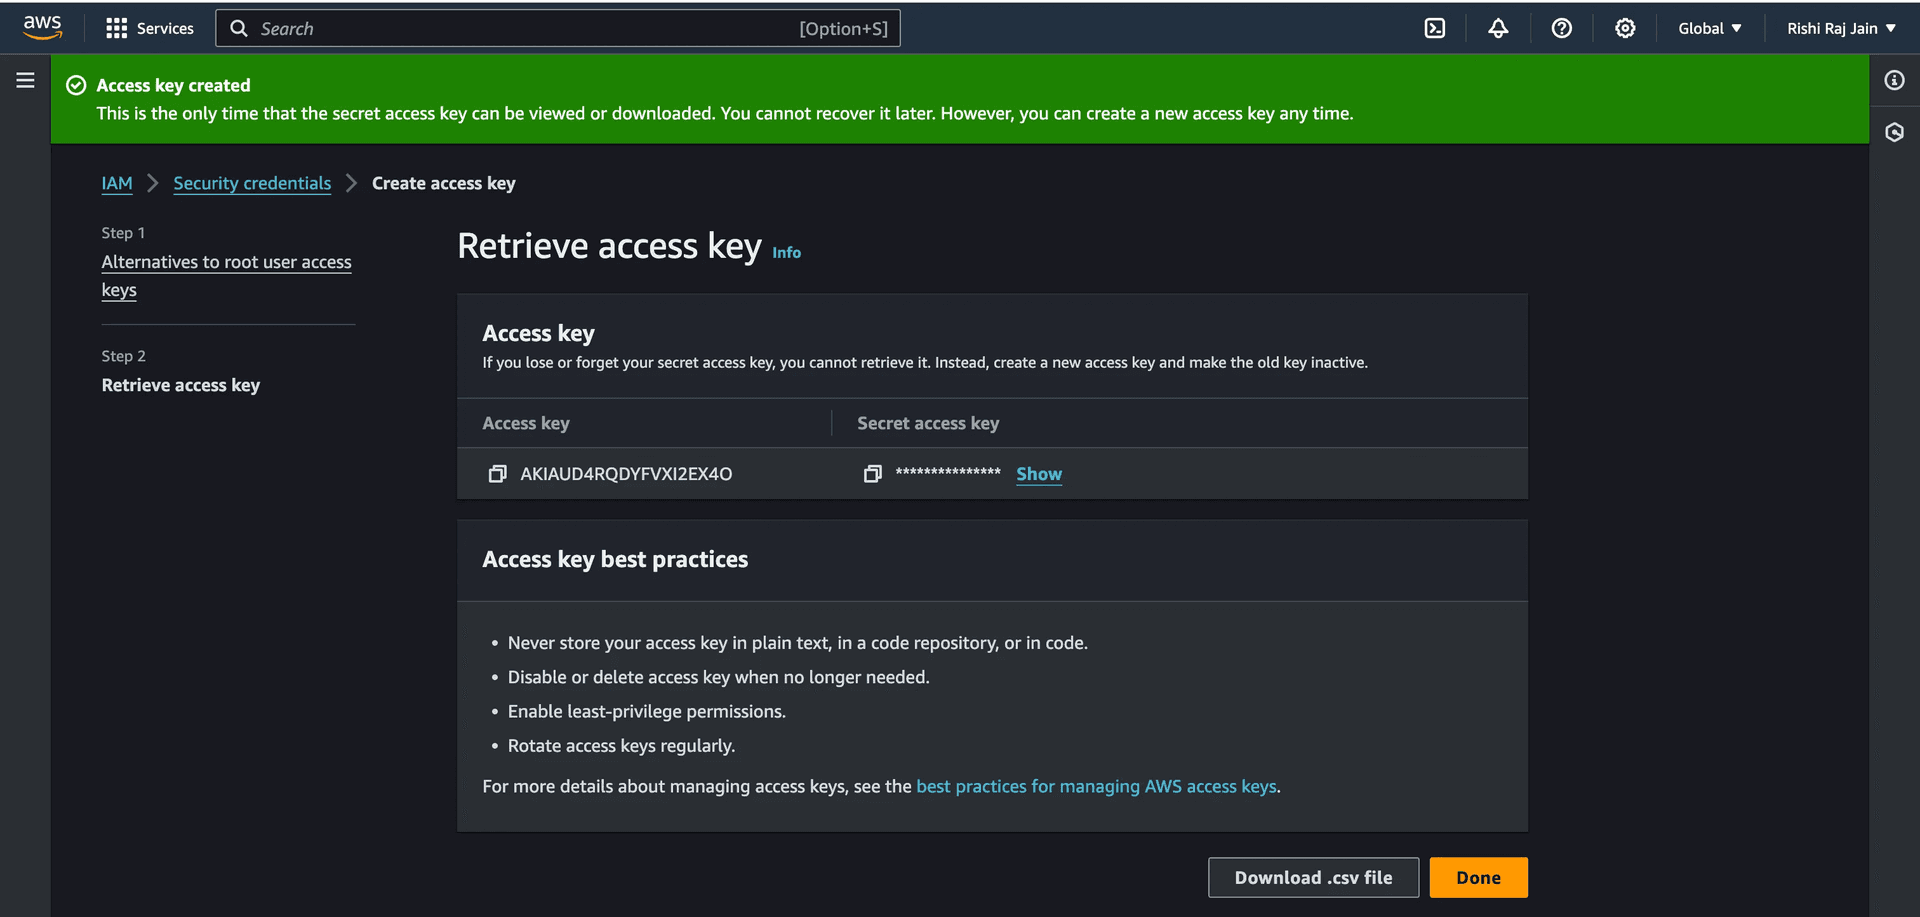
Create a new Next.js application
Let’s get started by creating a new Next.js project. Open your terminal and run the following command:
npx create-next-app@latest my-appWhen prompted, choose:
Yeswhen prompted to use TypeScript.Nowhen prompted to use ESLint.Yeswhen prompted to use Tailwind CSS.Nowhen prompted to usesrc/directory.Yeswhen prompted to use App Router.Nowhen prompted to customize the default import alias (@/*).
Once that is done, move into the project directory and start the app in developement mode by executing the following command:
cd my-app
npm run dev
The app should be running on localhost:3000. Stop the development server to install the libraries necessary to build the application:
npm install @aws-sdk/client-s3 @aws-sdk/s3-request-presigner @neondatabase/serverlessThe command installed the following libraries:
@aws-sdk/client-s3: AWS SDK for JavaScript S3 Client for Node.js, Browser and React Native.@aws-sdk/s3-request-presigner: SDK to generate signed url for S3.@neondatabase/serverless: Neon's PostgreSQL driver for JavaScript and TypeScript.
Now, create a .env file at the root of your project. You are going to add the credentials you obtained earlier.
It should look something like this:
# AWS Environment Variables
AWS_KEY_ID="..."
AWS_SECRET_ACCESS_KEY=".../...+"
AWS_S3_BUCKET_NAME="...-bucket-0"

# Postgres (powered by Neon) Environment Variable
DATABASE_URL="postgresql://neondb_owner:...@...-pooler.us-east-2.aws.neon.tech/neondb?sslmode=require"
Now, let's move on to creating an API route to obtain a presigned URL to upload objects to.
Create a Presigned URL with Amazon S3 SDK
Presigned URLs allow you to upload large chunks of data directly at the source (here, Amazon S3).
This saves you from a couple limitations of a server-based upload operation:
- maximum request payload restrictions (on a hosting service, especially in serverless)
- huge RAM required to process multiple large file buffers at the same time
You will create an API endpoint that accepts the file name and it's content type to be uploaded via a presigned URL. In Next.js, you can create an API endpoint by creating a route.ts file at any directory level inside the app directory. To use /api/presigned as the desired API route, create a file app/api/presigned/route.ts with the following code:
// File: app/api/presigned/route.ts

import { NextResponse, type NextRequest } from "next/server";

export async function GET(request: NextRequest) {
  const accessKeyId = process.env.AWS_KEY_ID;
  const secretAccessKey = process.env.AWS_SECRET_ACCESS_KEY;
  const s3BucketName = process.env.AWS_S3_BUCKET_NAME;
  if (!accessKeyId || !secretAccessKey || !s3BucketName) {
    return new Response(null, { status: 500 });
  }
  const searchParams = request.nextUrl.searchParams;
  const fileName = searchParams.get("fileName");
  const contentType = searchParams.get("contentType");
  if (!fileName || !contentType) {
    return new Response(null, { status: 500 });
  }
}
The code above defines a GET handler that validates the presence of all the environment variables required, and the file name and it's content type.
Next, append the following code to return a JSON from the endpoint containing the presigned URL as signedUrl:
// File: app/api/presigned/route.ts

import { NextResponse, type NextRequest } from "next/server";
import { getSignedUrl } from "@aws-sdk/s3-request-presigner";
import { S3Client, PutObjectCommand } from "@aws-sdk/client-s3";

export async function GET(request: NextRequest) {
  const accessKeyId = process.env.AWS_KEY_ID;
  const secretAccessKey = process.env.AWS_SECRET_ACCESS_KEY;
  const s3BucketName = process.env.AWS_S3_BUCKET_NAME;
  if (!accessKeyId || !secretAccessKey || !s3BucketName) {
    return new Response(null, { status: 500 });
  }
  const searchParams = request.nextUrl.searchParams;
  const fileName = searchParams.get("fileName");
  const contentType = searchParams.get("contentType");
  if (!fileName || !contentType) {
    return new Response(null, { status: 500 });
  }
  const client = new S3Client({
    region: "eu-north-1",
    credentials: {
      accessKeyId,
      secretAccessKey,
    },
  });
  const command = new PutObjectCommand({
    Bucket: s3BucketName,
    Key: fileName,
    ContentType: contentType,
  });
  const signedUrl = await getSignedUrl(client, command, { expiresIn: 3600 });
  if (signedUrl) return NextResponse.json({ signedUrl });
  return new Response(null, { status: 500 });
}
The code above creates an S3 client using the @aws-sdk/client-s3 SDK. Then, it uses the getSignedUrl utility (from @aws-sdk/s3-request-presigner) to sign the URL.
Now, let's move on to building an endpoint to insert the reference to the uploaded object in Postgres.
Save Reference to S3 objects in Postgres
You will create an API endpoint that accepts the URL to the publicly accessible object. In this example, we'll create a table in Postgres, and associate the object URL with a user, for demonstration purposes. To use /api/user/image as the desired API route, create a file app/api/user/image/route.ts with the following code:
// File: app/api/user/image/route.ts

import { neon } from "@neondatabase/serverless";
import { NextResponse, type NextRequest } from "next/server";

export async function POST(request: NextRequest) {
  const { objectUrl } = await request.json();
  if (!process.env.DATABASE_URL) return new Response(null, { status: 500 });
  const sql = neon(process.env.DATABASE_URL);
  try {
    // Create the user table if it does not exist
    await sql('CREATE TABLE IF NOT EXISTS "user" (name TEXT, image TEXT)');
    // Mock call to get the user
    const user = "rishi"; // getUser();
    // Insert the user name and the reference to the image into the user table
    await sql('INSERT INTO "user" (name, image) VALUES ($1, $2)', [
      user,
      objectUrl,
    ]);
    return NextResponse.json({ code: 1 });
  } catch (e) {
    return NextResponse.json({
      code: 0,
      message: e instanceof Error ? e.message : e?.toString(),
    });
  }
}
The code above defines a POST endpoint, which first validates the presence of DATABASE_URL environment variable. Further, it creates a table named user if it does not exist, and inserts the record for a user named rishi with the object URL.
Now, let's move on to learning how to call these APIs in the front-end built with React.
Upload to Presigned URL with in-browser JavaScript
With the API routes defined, the flow to upload the objects and save references to it in the database, is in three steps:
1. Accept a file from the user
Using the HTML <input /> element, accept a file from the user to be uploaded to S3. Attach a listener to change in the file attached to upload programtically.
// File: app/page.tsx

"use client";

import { ChangeEvent } from "react";

export default function Home() {
  const uploadFile = (e: ChangeEvent<HTMLInputElement>) => {
    const file: File | null | undefined = e.target.files?.[0];
    if (!file) return;
    const reader = new FileReader();
    reader.onload = async (event) => {
      const fileData = event.target?.result;
      if (fileData) {
        // Fetch presigned URL and save reference in Postgres (powered by Neon)
      }
    };
    reader.readAsArrayBuffer(file);
  };
  return <input onChange={uploadFile} type="file" />;
}
2. Fetch the Presigned URL using the file name and type
Perform a GET call to /api/presigned API route with the file name and type as the query params. Obtain the presigned URL, and then upload the file as a Blob to it.
// File: app/page.tsx

"use client";

import { ChangeEvent } from "react";

export default function Home() {
  const uploadFile = (e: ChangeEvent<HTMLInputElement>) => {
    const file: File | null | undefined = e.target.files?.[0];
    if (!file) return;
    const reader = new FileReader();
    reader.onload = async (event) => {
      const fileData = event.target?.result;
      if (fileData) {
        const presignedURL = new URL("/api/presigned", window.location.href);
        presignedURL.searchParams.set("fileName", file.name);
        presignedURL.searchParams.set("contentType", file.type);
        fetch(presignedURL.toString())
          .then((res) => res.json())
          .then((res) => {
            const body = new Blob([fileData], { type: file.type });
            fetch(res.signedUrl, {
              body,
              method: "PUT",
            }).then(() => {
              // Save reference to the object in Postgres (powered by Neon)
            });
          });
      }
    };
    reader.readAsArrayBuffer(file);
  };
  return <input onChange={uploadFile} type="file" />;
}
3. Insert the reference to the object in the Postgres
Perform a POST to the /api/user/image route, with the presigned URL configured to not contain the query parameters. The stripped URL is an absolute reference to the publicly available object uploaded.
// File: app/page.tsx

"use client";

import { ChangeEvent } from "react";

export default function Home() {
  const uploadFile = (e: ChangeEvent<HTMLInputElement>) => {
    const file: File | null | undefined = e.target.files?.[0];
    if (!file) return;
    const reader = new FileReader();
    reader.onload = async (event) => {
      const fileData = event.target?.result;
      if (fileData) {
        const presignedURL = new URL("/api/presigned", window.location.href);
        presignedURL.searchParams.set("fileName", file.name);
        presignedURL.searchParams.set("contentType", file.type);
        fetch(presignedURL.toString())
          .then((res) => res.json())
          .then((res) => {
            const body = new Blob([fileData], { type: file.type });
            fetch(res.signedUrl, {
              body,
              method: "PUT",
            }).then(() => {
              fetch("/api/user/image", {
                method: "POST",
                headers: { "Content-Type": "application/json" },
                body: JSON.stringify({
                  objectUrl: res.signedUrl.split("?")[0],
                }),
              });
            });
          });
      }
    };
    reader.readAsArrayBuffer(file);
  };
  return <input onChange={uploadFile} type="file" />;
}
Run the app
Execute the following command to run your application locally:
npm run devYou should now be able to go through the entire workflow of selecting a file, uploading it to S3, and referencing it later by saving it in the database.
Need help?
Join our Discord Server to ask questions or see what others are doing with Neon. Users on paid plans can open a support ticket from the console. For more detail, see Getting Support.
Last updated on